Neonatal Sensor Application Guide
Learn how to apply the sensor on neonatal patients for the Sentec Transcutaneous Monitoring System.
Neonatal Sensor Application Guide
Learn how to apply the sensor on neonatal patients for the Sentec Transcutaneous Monitoring System.
Neonatal Sensor Application Guide
Learn how to apply the sensor on neonatal patients for the Sentec Transcutaneous Monitoring System.
How to apply the Sentec sensor on neonates
Watch the video or follow the instructions below to properly apply the Sentec sensor on neonatal patients.
How to apply the Sentec sensor on neonates
Watch the video or follow the instructions below to properly apply the Sentec sensor on neonatal patients.
Step-by-step instructions for neonatal sensor application
STEP ONE
Ensure system readiness
Ensure SDM Settings and SDM Profile are appropriate for the patient, the chosen measurement site, the condition of the skin, perfusion at the site, and the specific clinical setting.
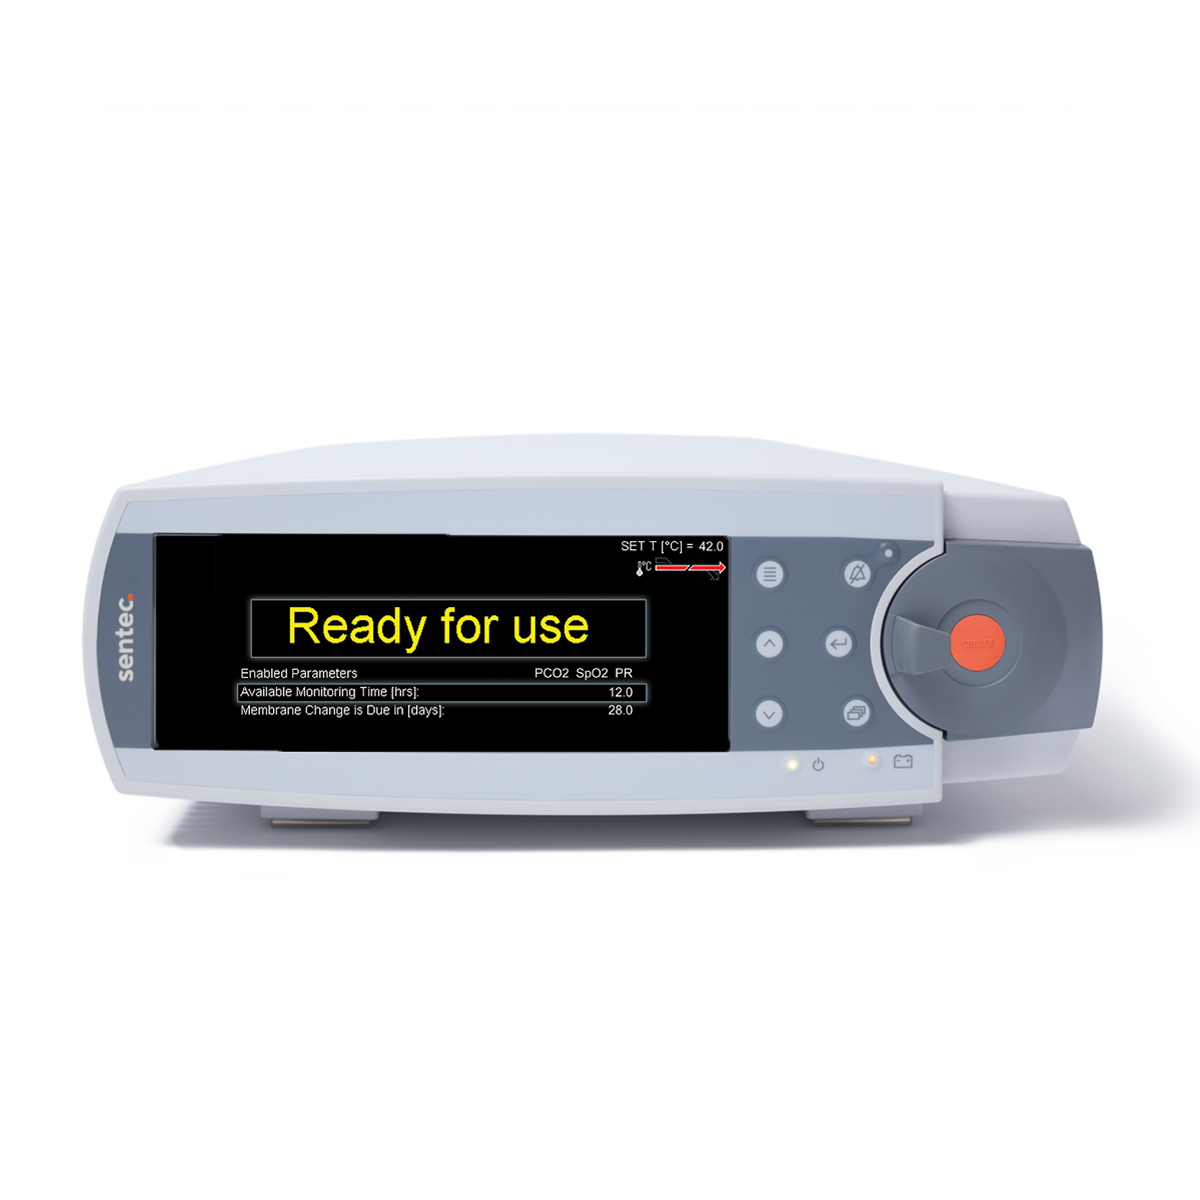
Verify system readiness by confirming the screen displays the ‘Ready for use’ message.
STEP TWO
Select a measurement site
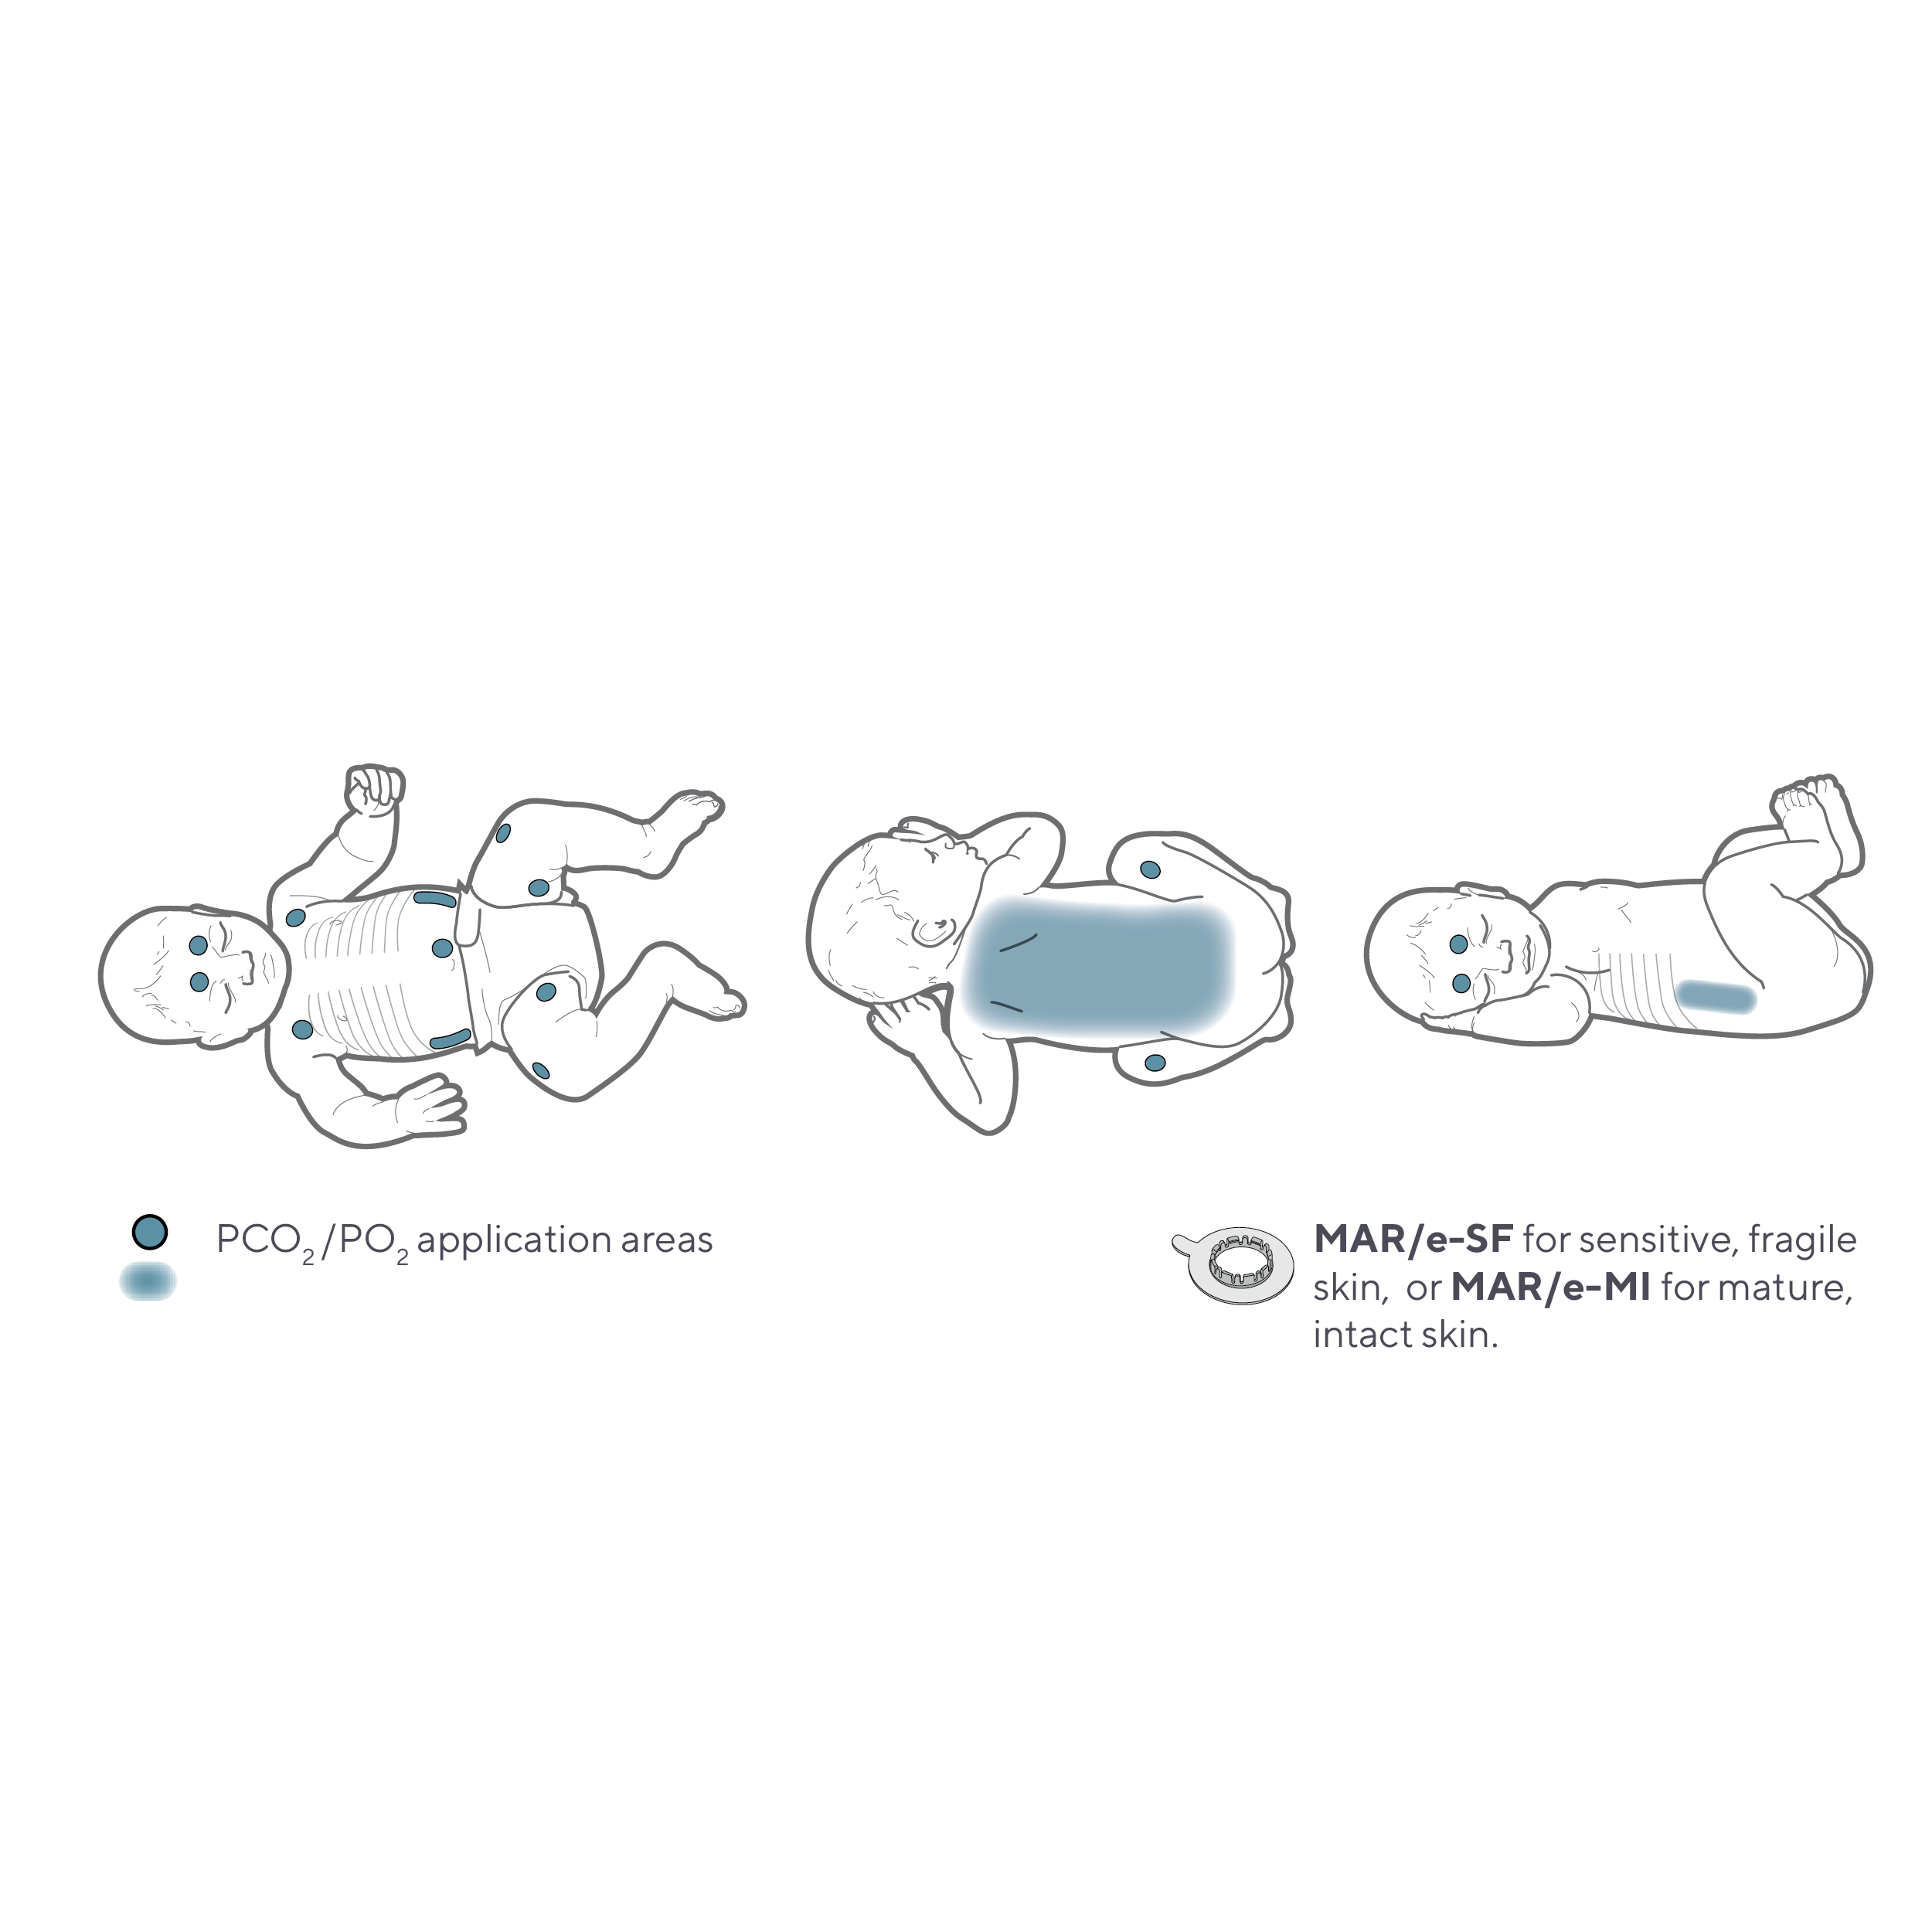
Choose a measurement site. Refer to the image above for recommended site locations.
Consider patient positioning to ensure there will be no external pressure on the sensor.
STEP THREE
Prepare the measurement site
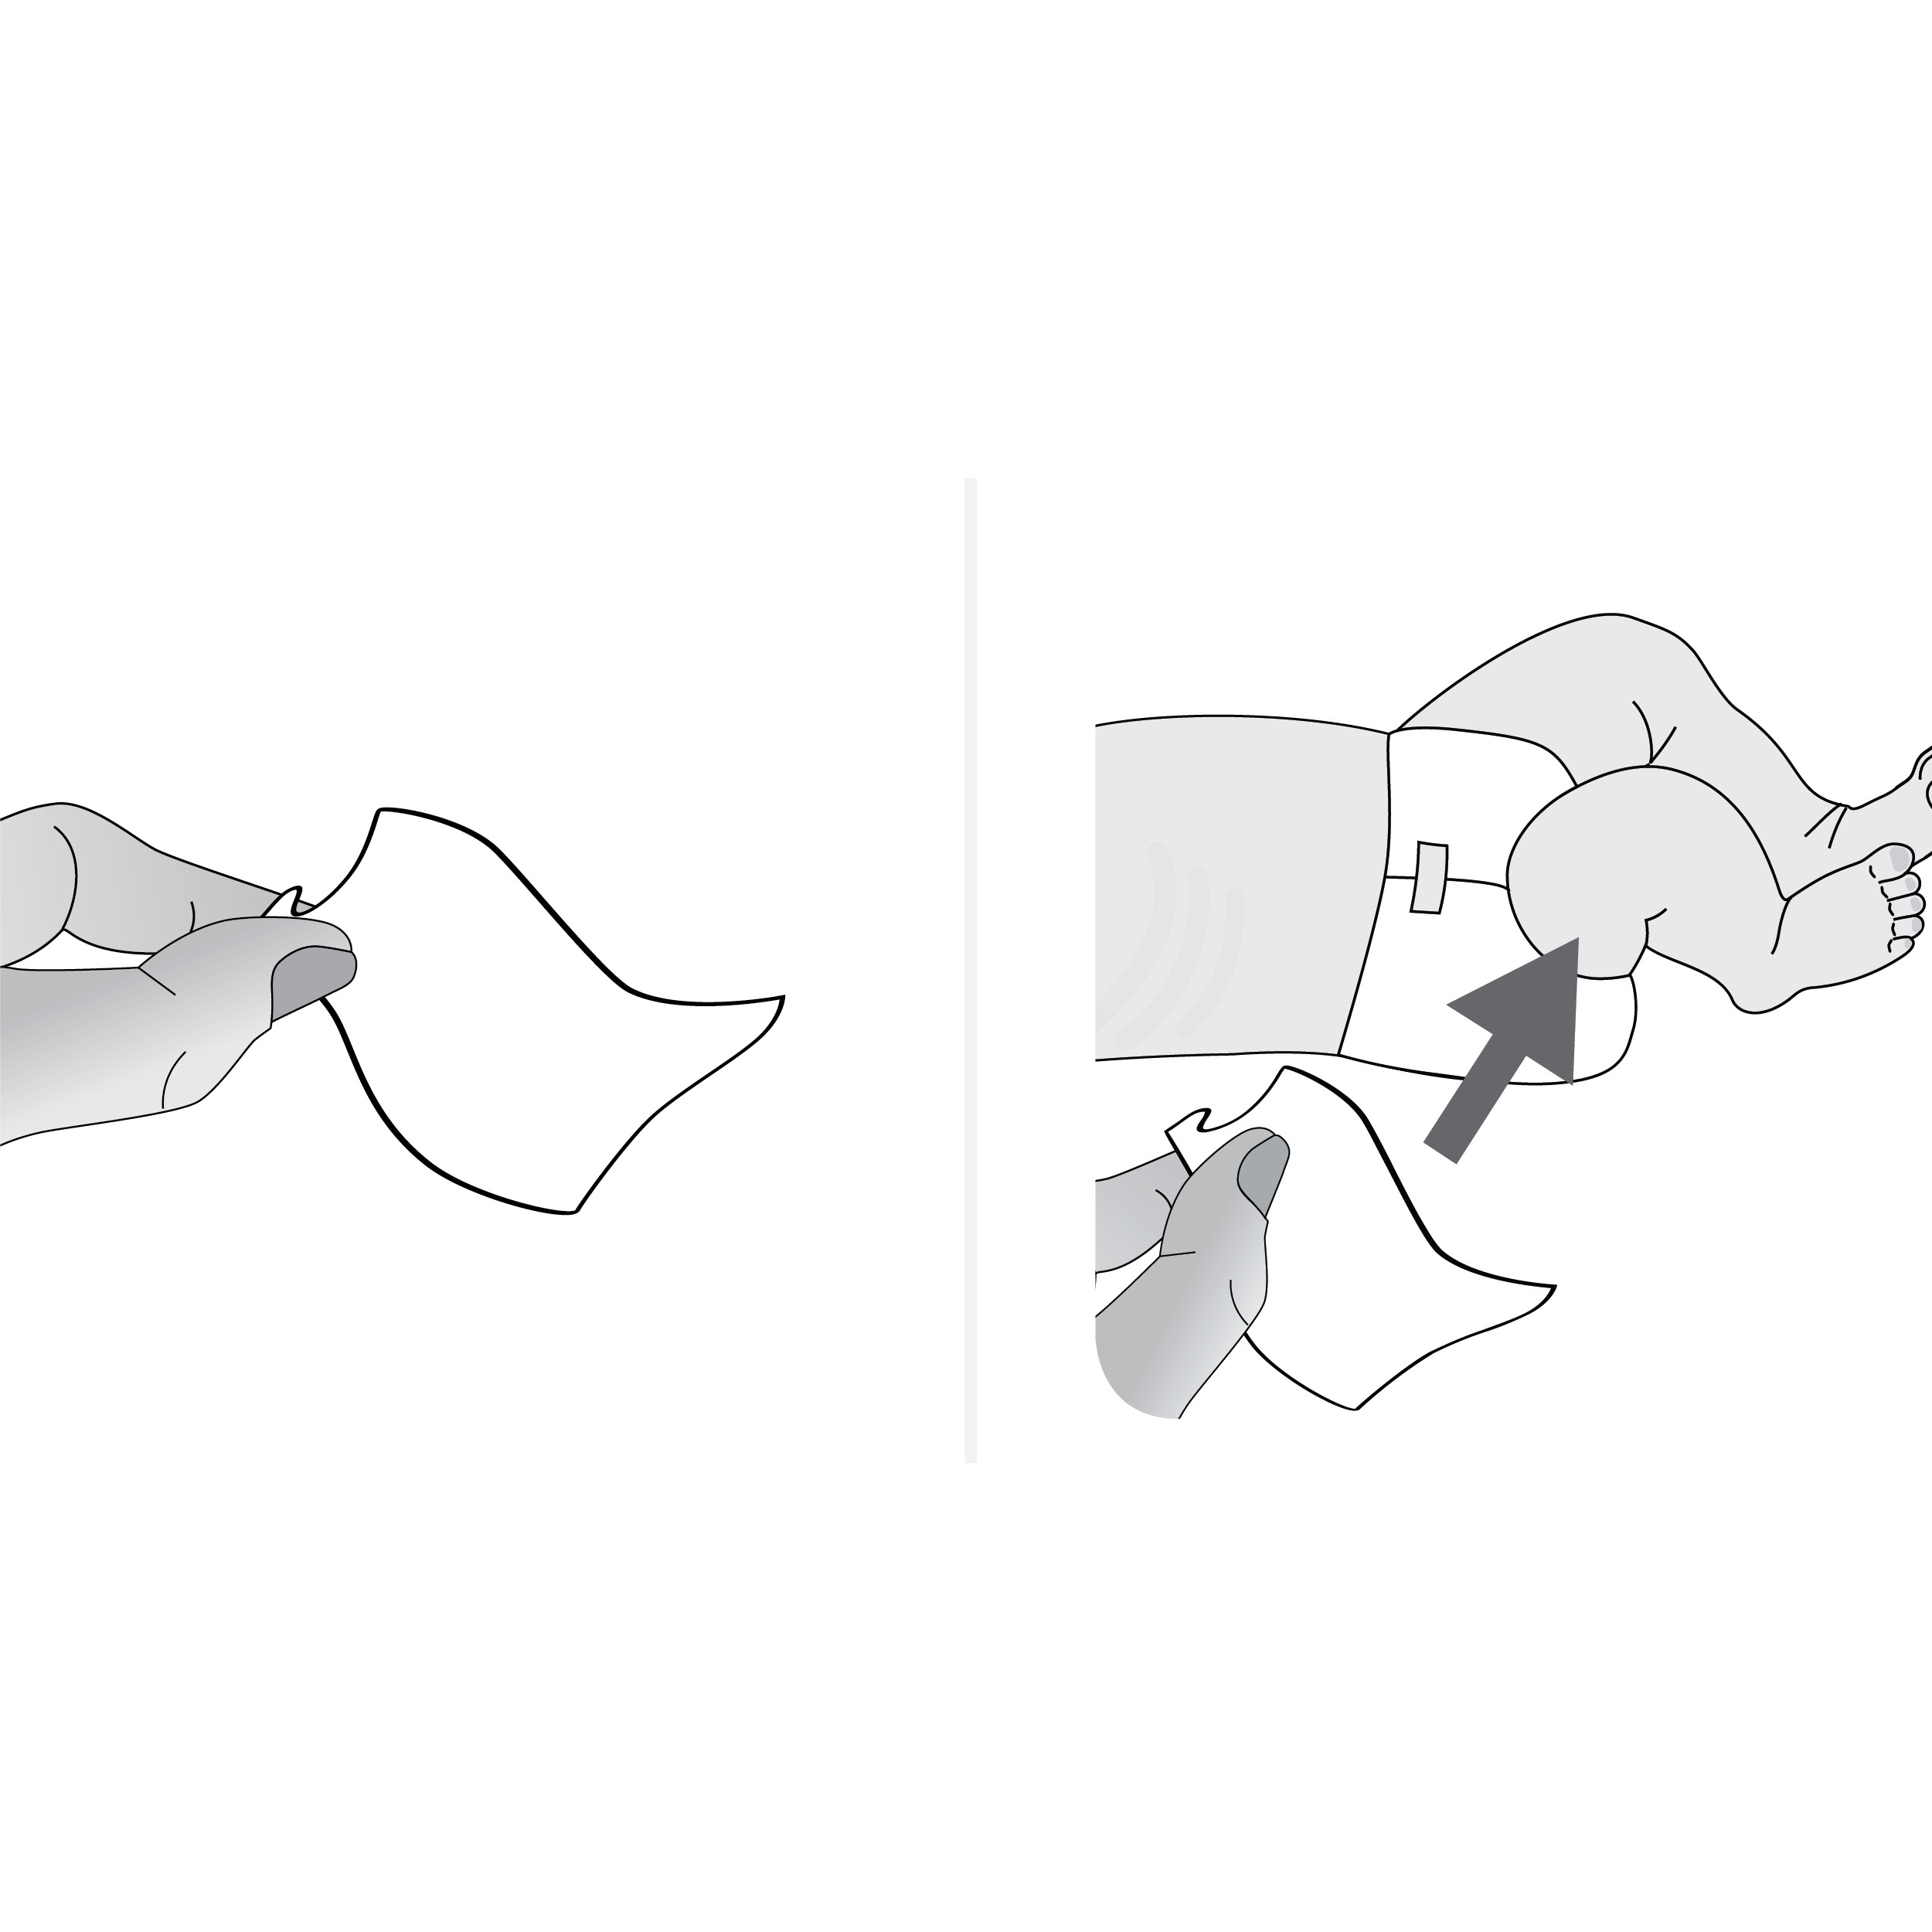
Clean the skin with 70% isopropanol (or according to your institution’s skin cleaning/degreasing procedures) and allow for the skin to dry.
f necessary, remove hair to allow for better adhesion and contact with the skin.
STEP FOUR
Apply attachment ring
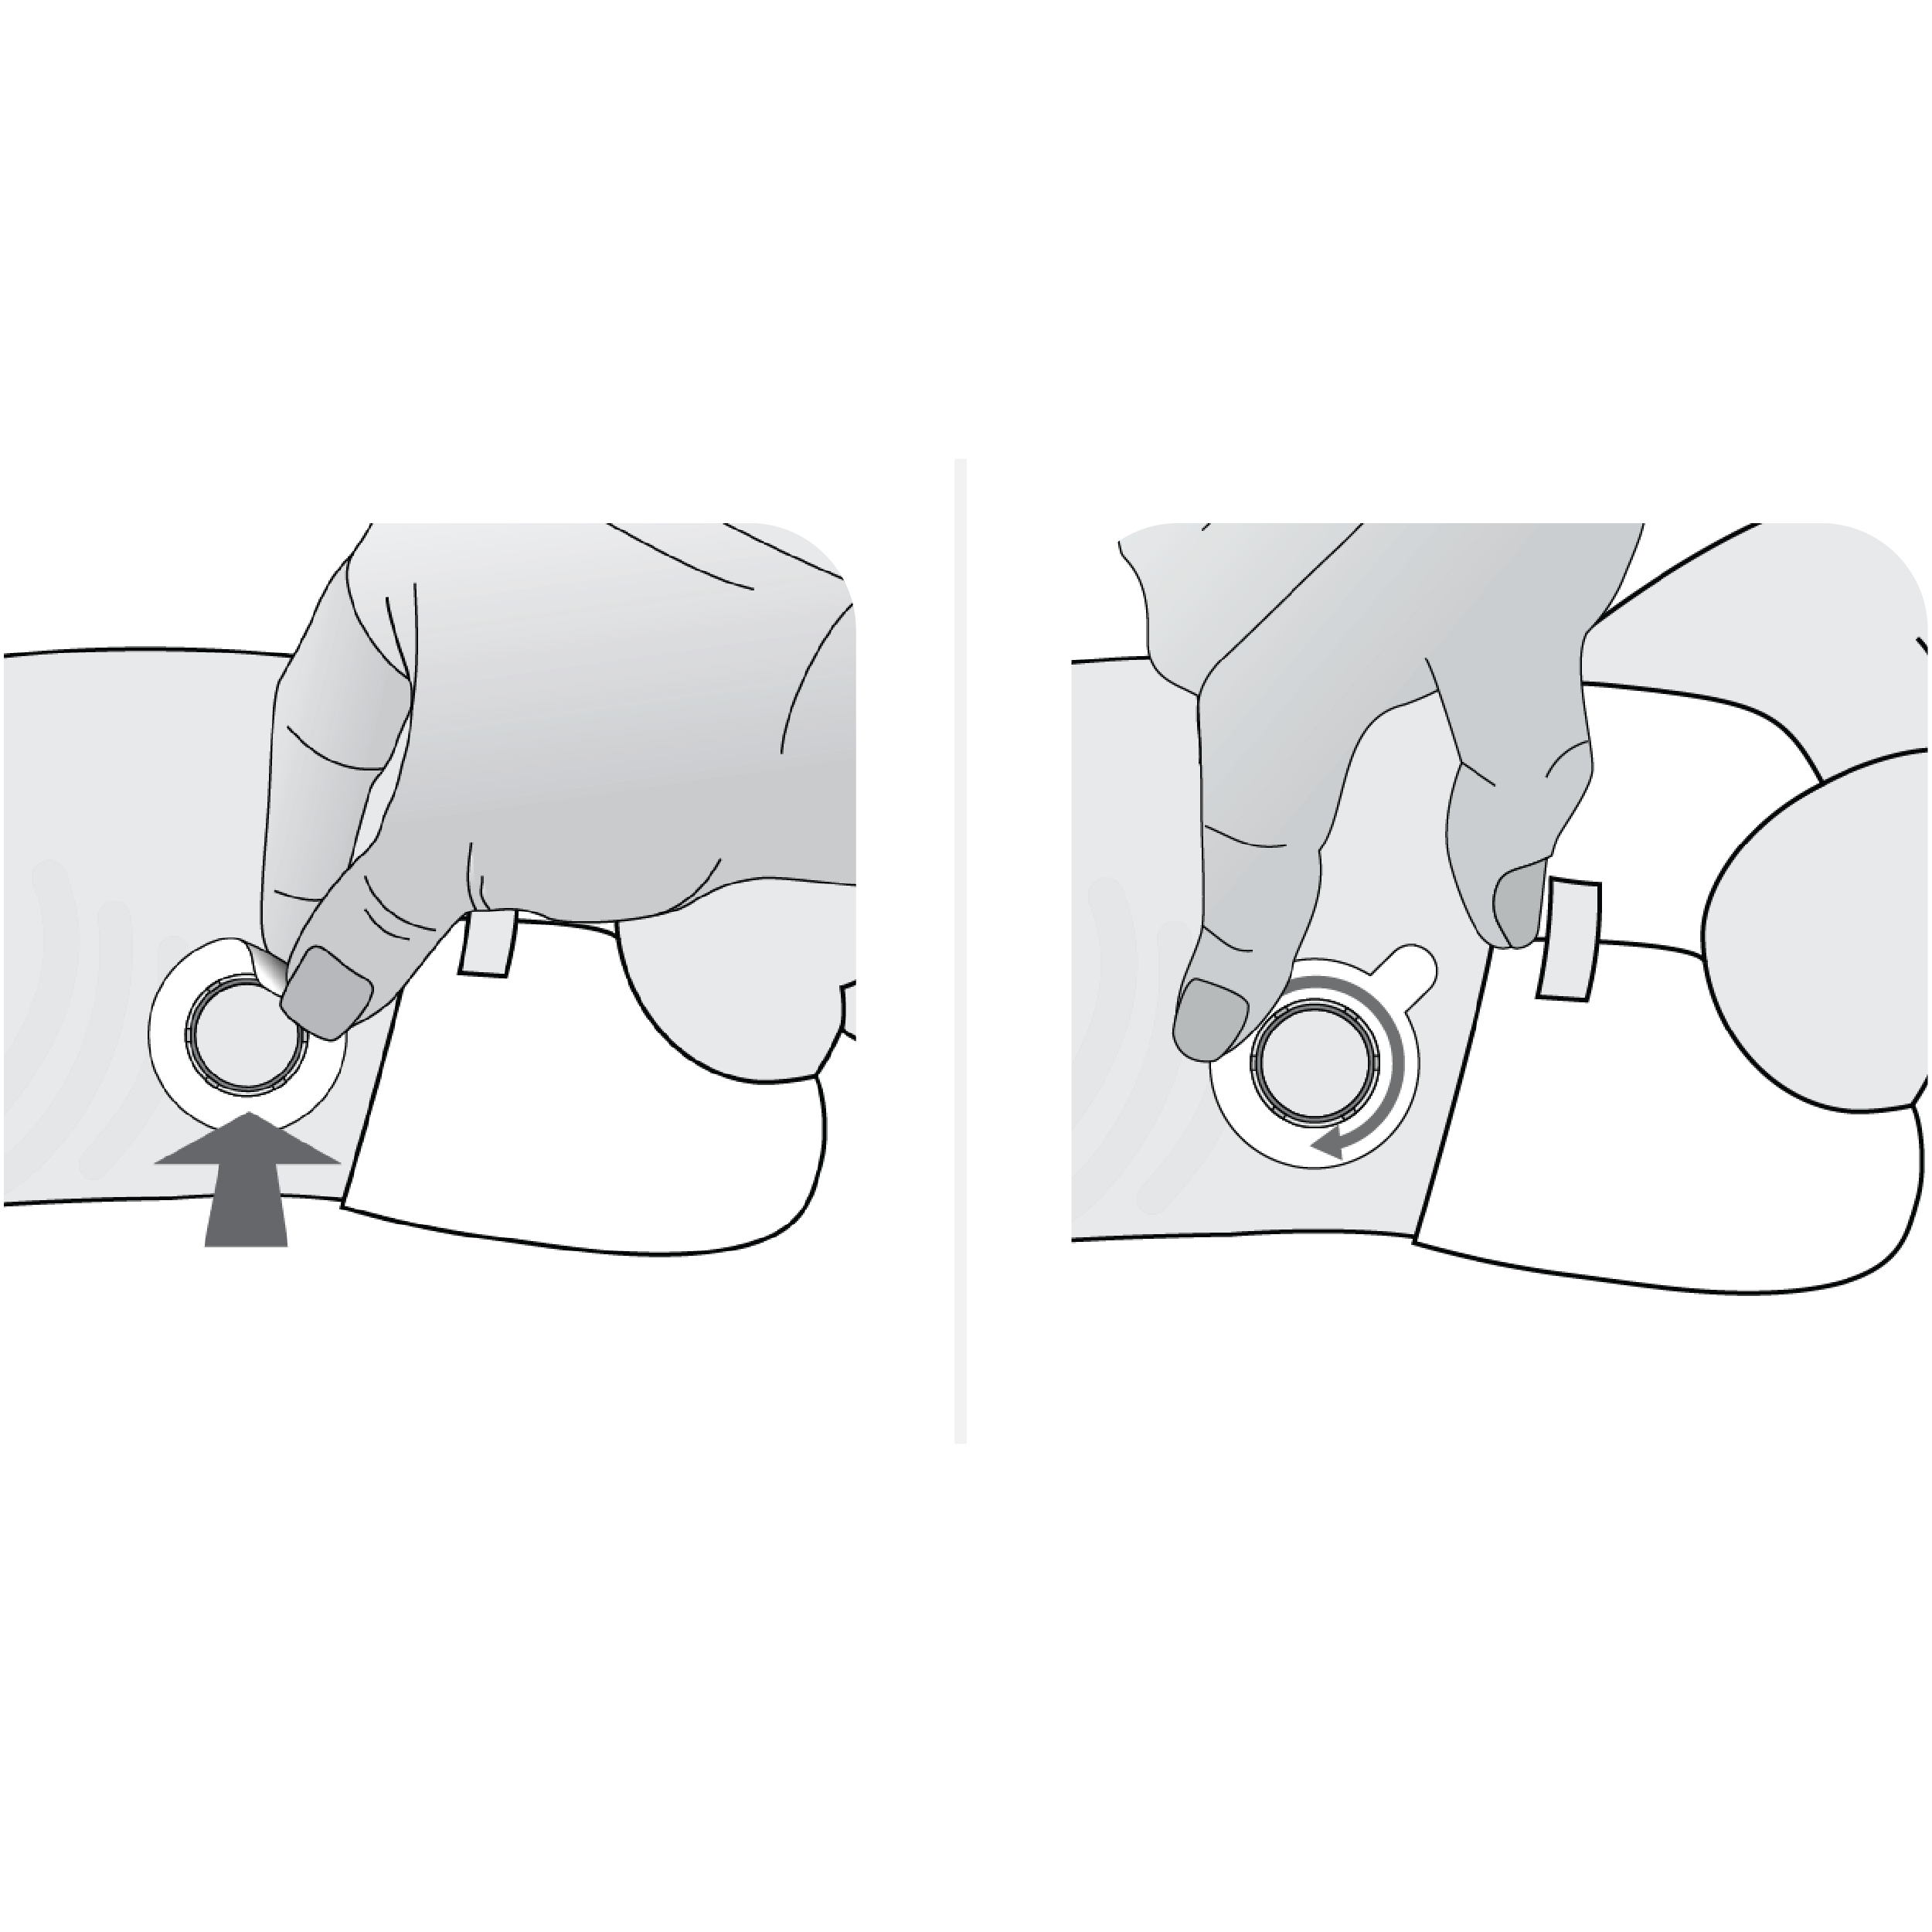
Take the Multi-Site Attachment Ring out of the package and pull off the liner protecting the adhesive tape. (If using the non-adhesive wrap, refer to these instructions.)
Apply the ring to the measurement site. Ensure that the skin under the adhesive is not wrinkled.
Press gently on the retainer ring and move your finger around its circumference to ensure good adhesion of the ring to the skin.
STEP FIVE
Prepare the sensor
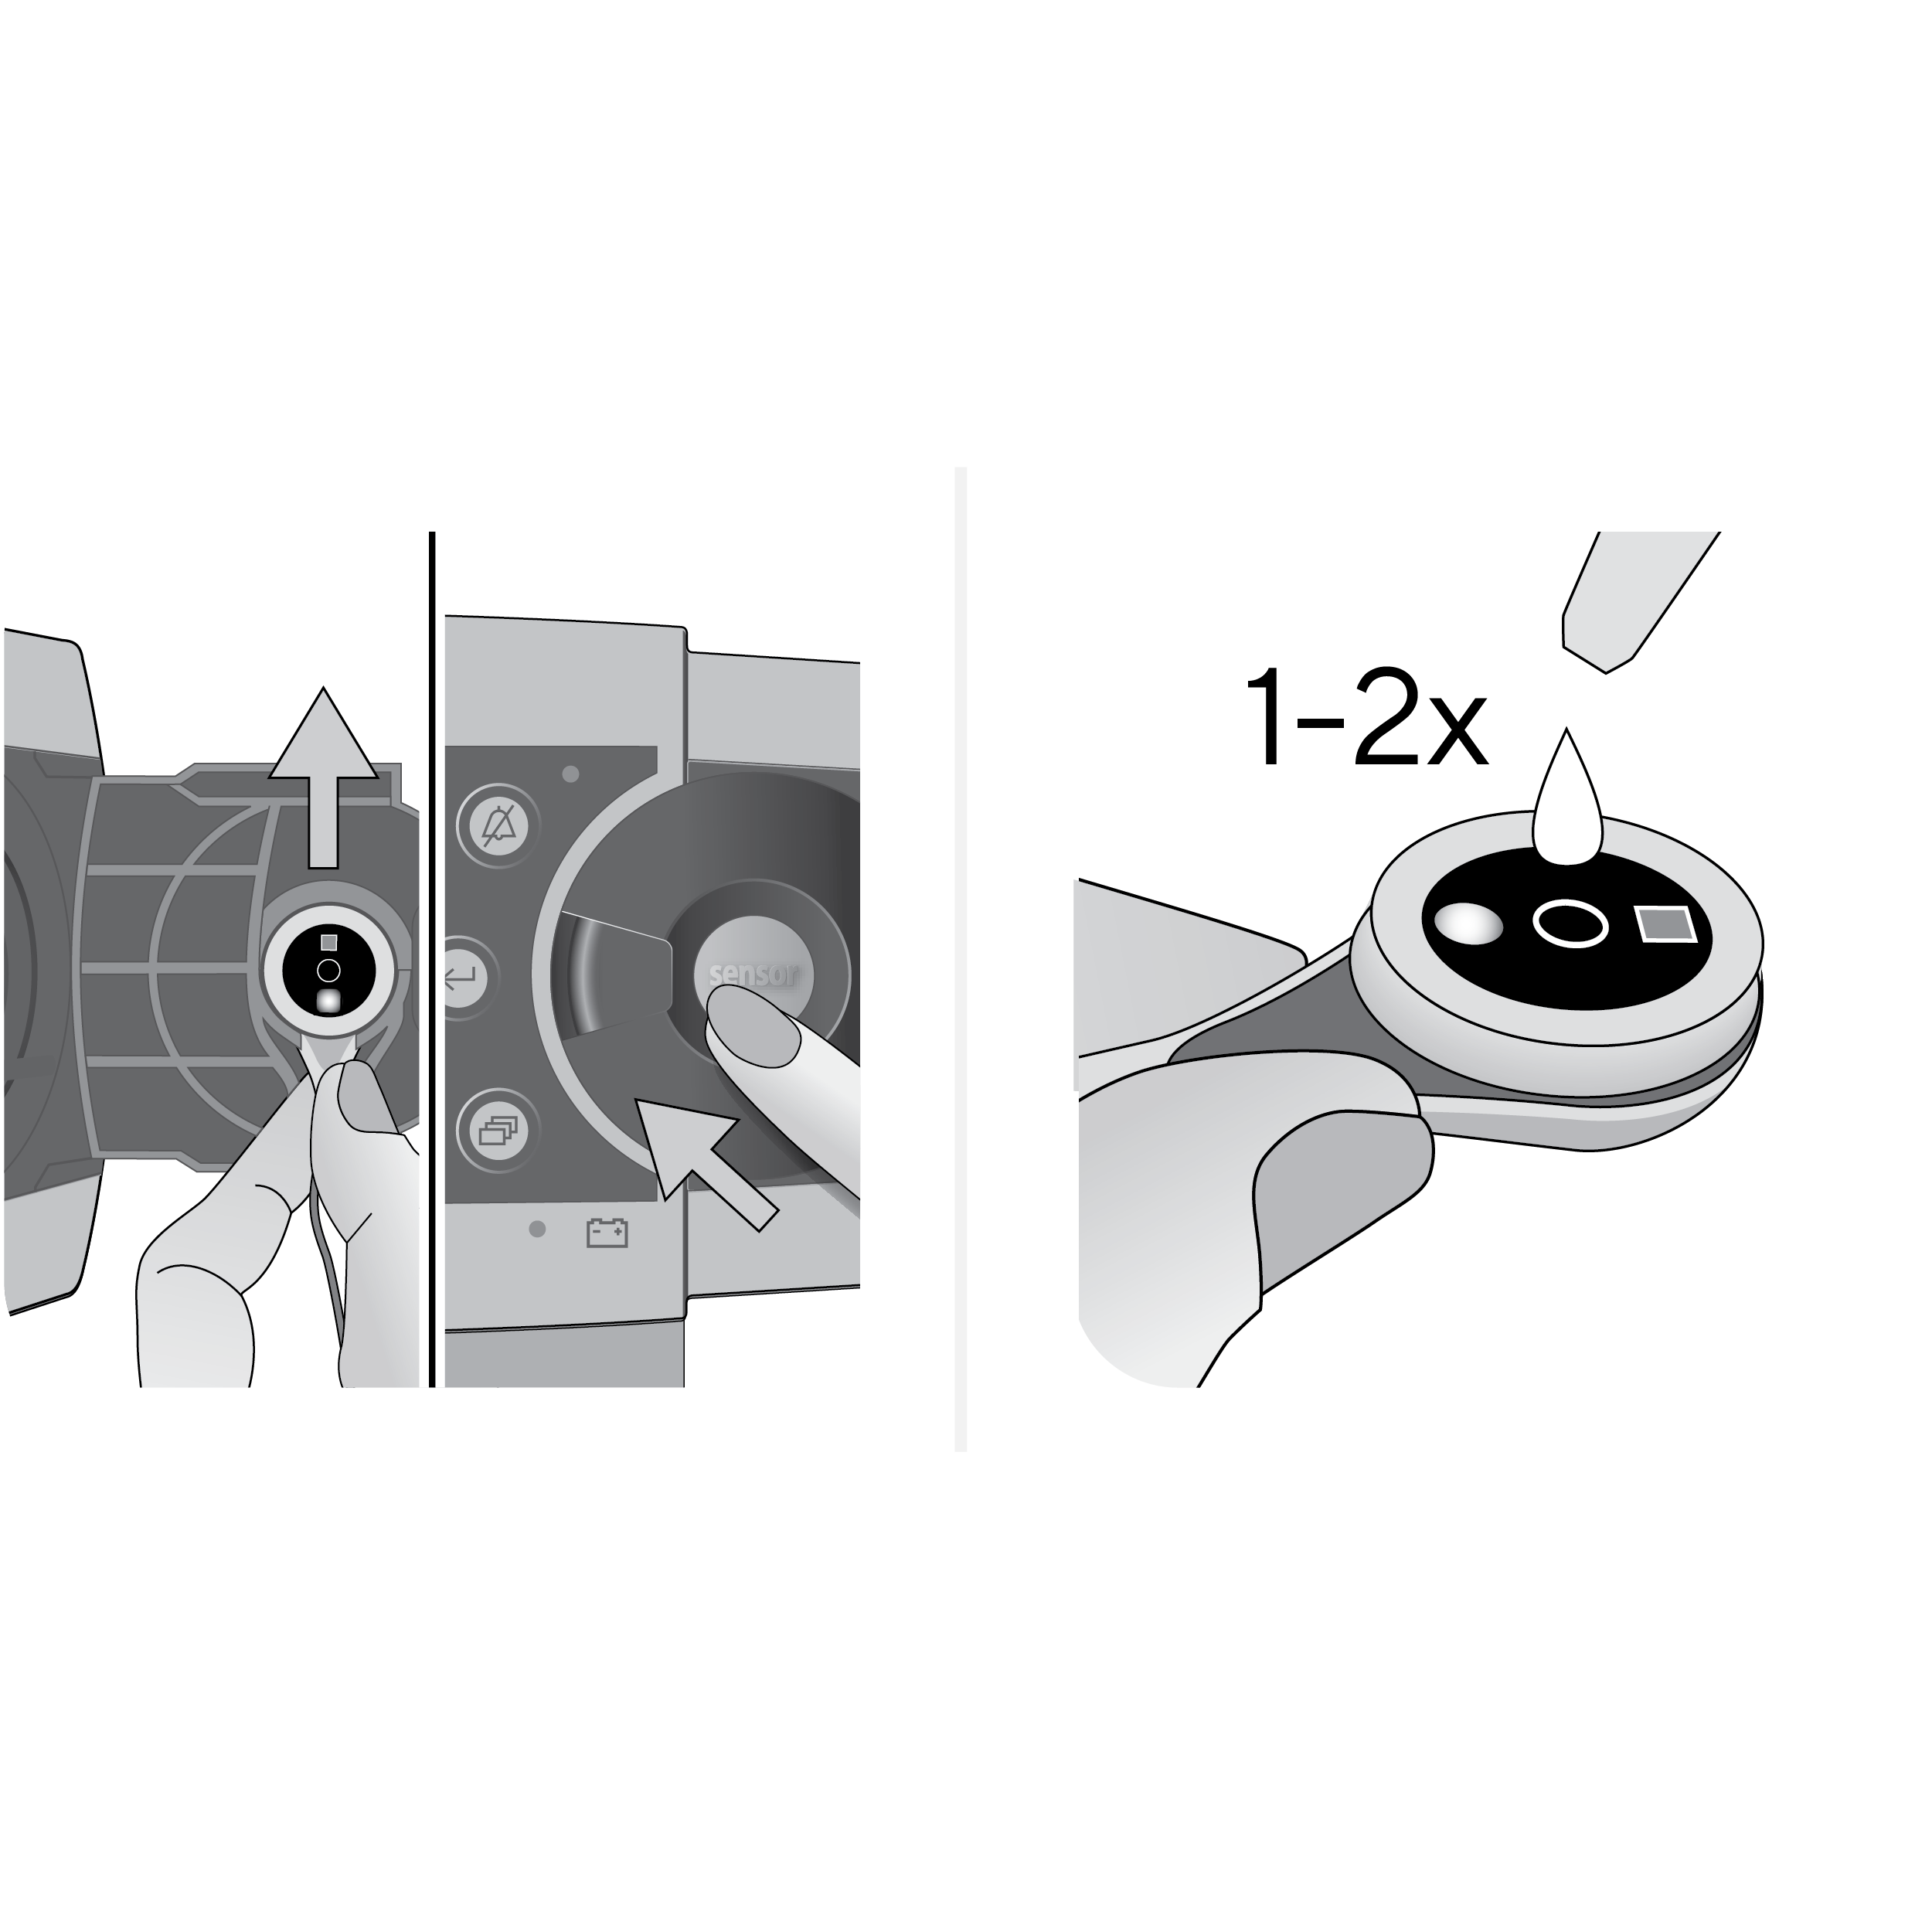
Open the Docking Station Door and remove the sensor.
Close the Docking Station Door.
Check the condition of the sensor membrane and the integrity of the sensor. If necessary, change the membrane. Do not use the sensor if any problems are noted.
Apply 1-2 small drops of contact liquid to the center of the sensor surface.
Keep the sensor horizontal (membrane facing upwards) so that the contact liquid does not run off the membrane. Flip over the sensor just before inserting it into the ring.
TIP! Always grab the sensor at its neck to avoid damaging the sensor cable.
TIP! Use Sentec Contact Gel for more accurate readings.
TIP! Alternatively, you can apply one small drop of contact liquid to the skin area in the center of the attachment ring.
TIP! Avoid wetting the adhesive tape.
STEP SIX
Attach the sensor
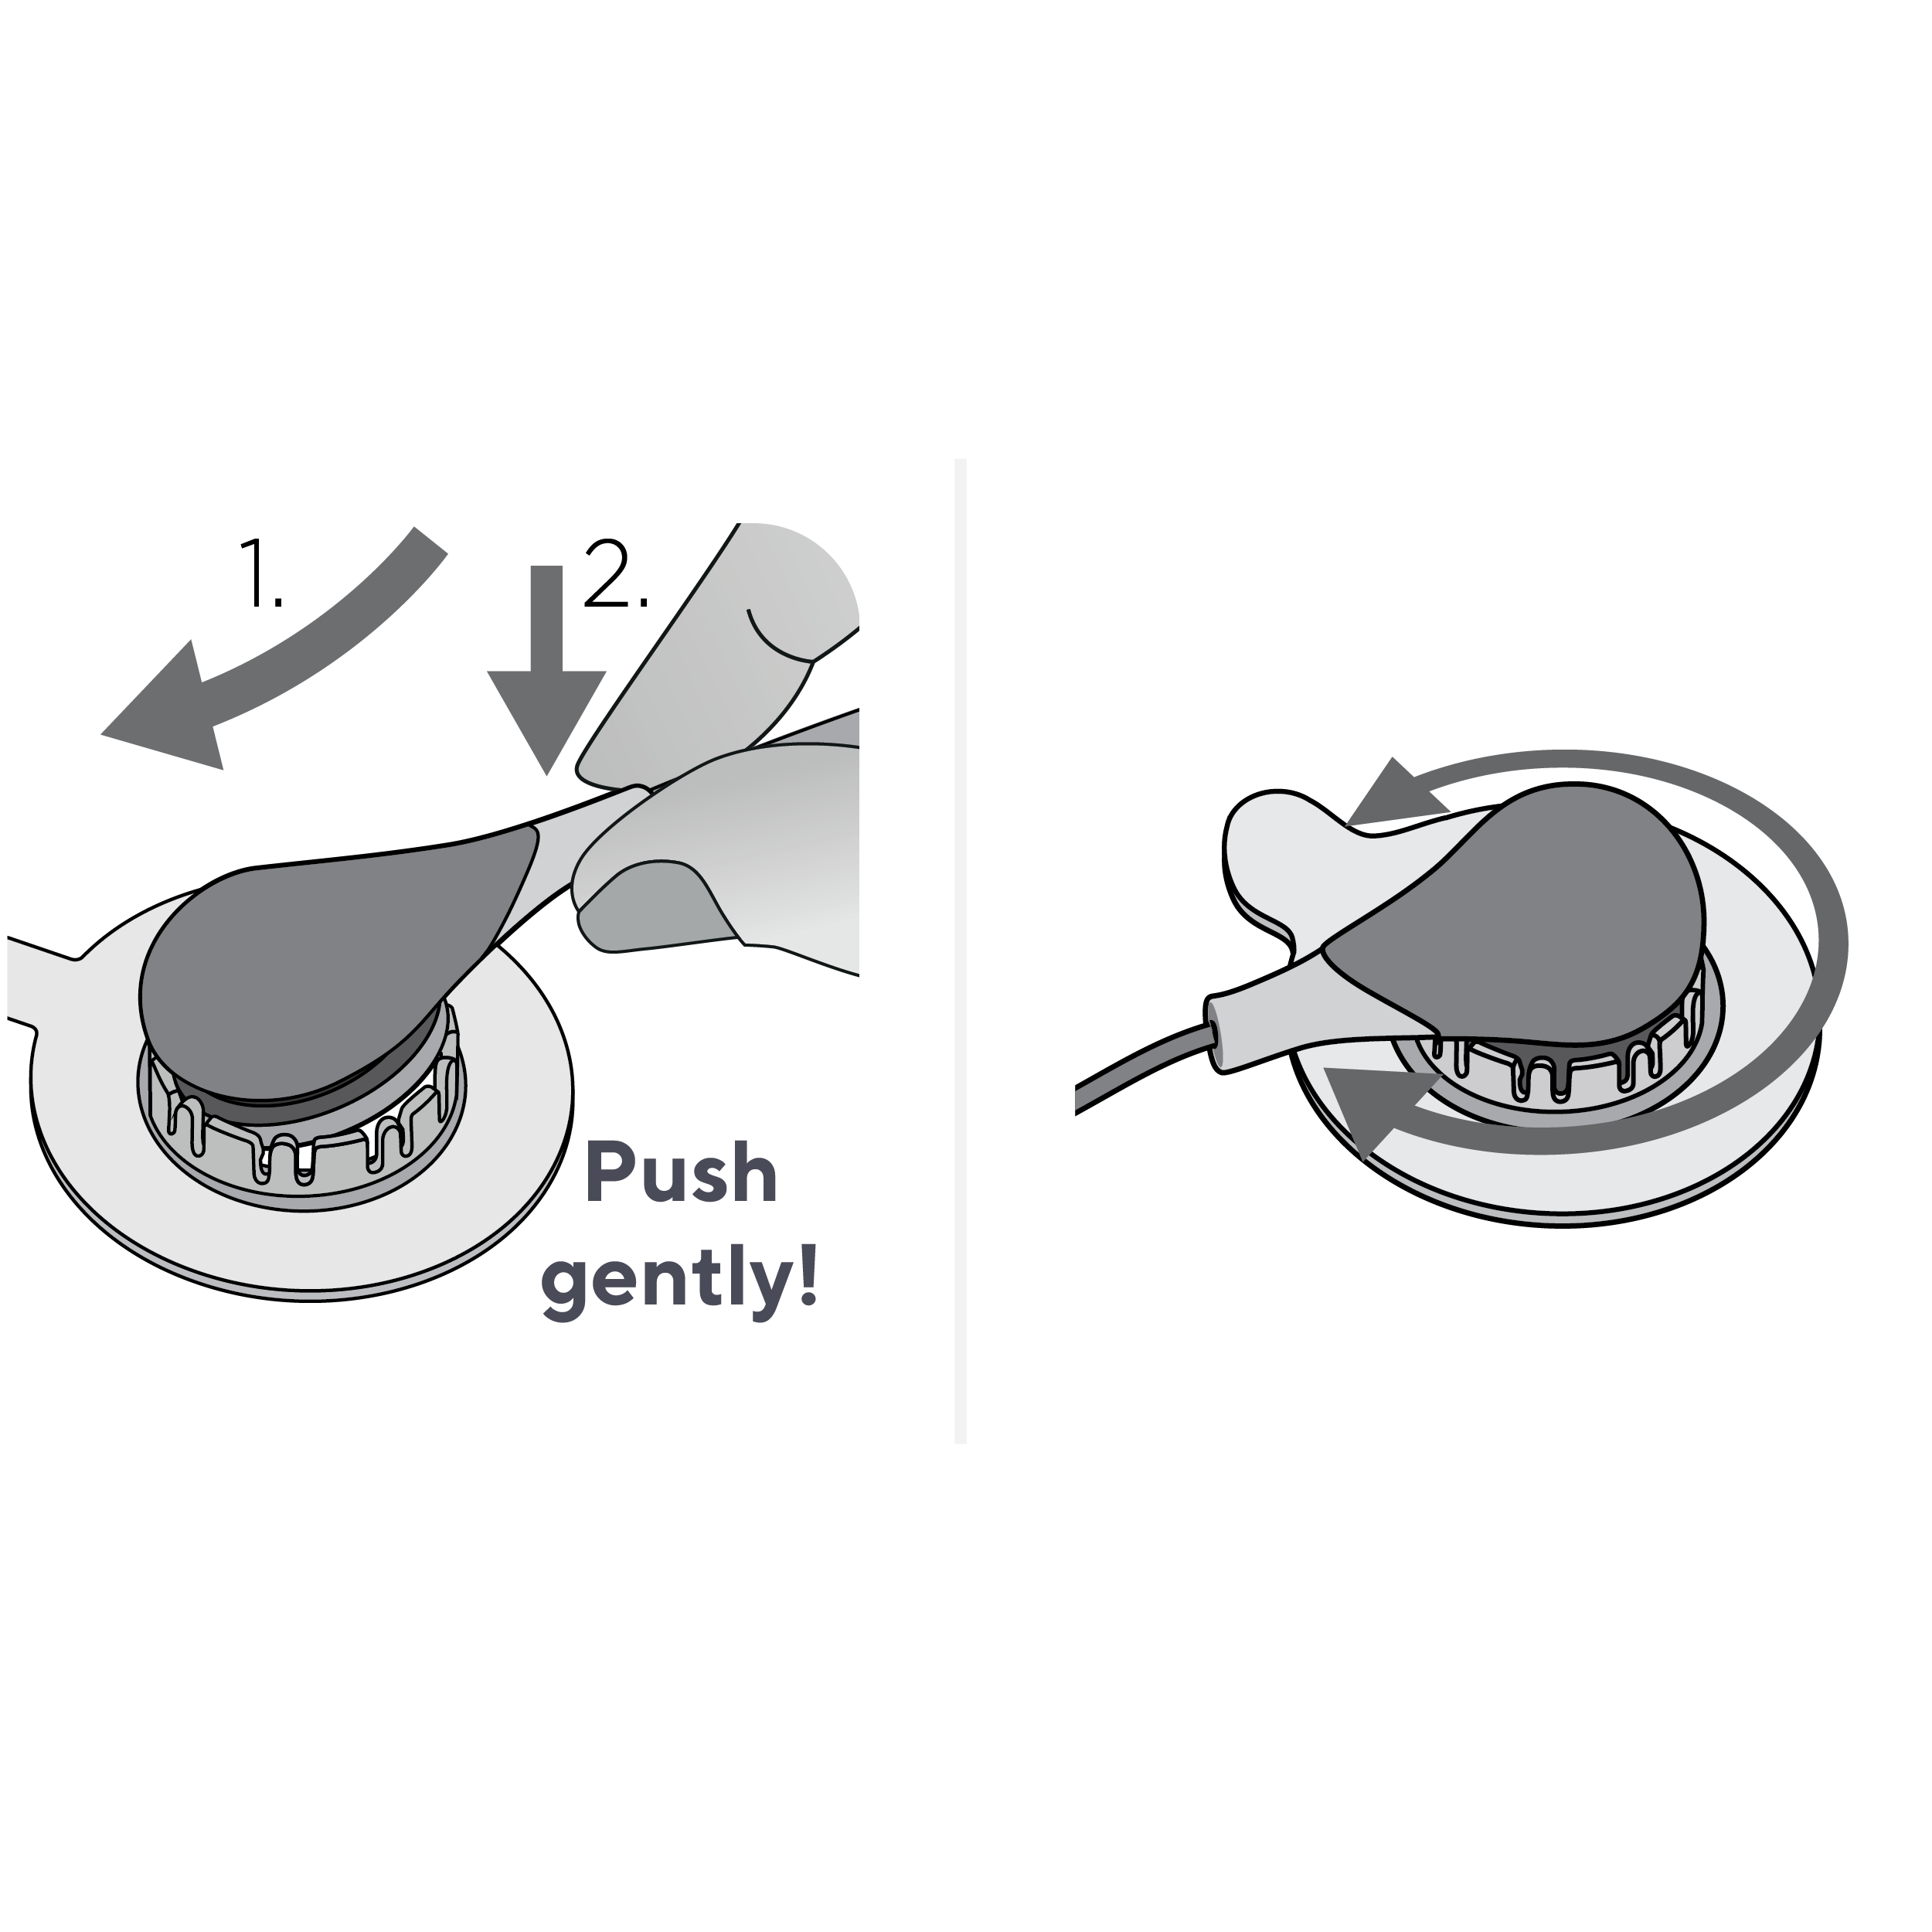
Holding the sensor at its neck, approach the attachment ring and first insert the nose of the sensor into the retainer ring.
Apply slight downward pressure on the sensor neck to position it in the ring. The spring tension of the retainer ring will pull the sensor into place with little to no pressure on the skin.
Rotate the sensor in the ring and press the sensor gently against the skin to spread the contact liquid.
Ensure that air gaps are eliminated between the skin and the sensor.
TIP! Check that the sensor can be easily rotated to ensure it is snapped in correctly.

STEP SEVEN
Verify sensor stabilization
Verify that the SDM detects that the sensor was placed on the patient and the PCO2 value begins to stabilize (PCO2 value in gray). Stabilization can take between 2-10 minutes. Once stabilized, the PCO2 value will turn green and the trend will begin to appear on the screen.
If the values do not stabilize or are not rising, check the sensor application for good contact between the skin and sensor.
If necessary, readjust sensor application or reposition the sensor.
TIP! You can change alarm limits for an individual patient by accessing the alarm menu.
Step-by-step instructions for neonatal sensor application

STEP ONE
Ensure system readiness
Ensure SDM Settings and SDM Profile are appropriate for the patient, the chosen measurement site, the condition of the skin, perfusion at the site, and the specific clinical setting.
Verify system readiness by confirming the screen displays the ‘Ready for use’ message.

STEP TWO
Select a measurement site
Choose a measurement site. Refer to the image above for recommended site locations.
Consider patient positioning to ensure there will be no external pressure on the sensor.

STEP THREE
Prepare the measurement site
Clean the skin with 70% isopropanol (or according to your institution’s skin cleaning/degreasing procedures) and allow for the skin to dry.
If necessary, remove hair to allow for better adhesion and contact with the skin.

STEP FOUR
Apply attachment ring
Take the Multi-Site Attachment Ring out of the package and pull off the liner protecting the adhesive tape. (If using the non-adhesive wrap, refer to these instructions.)
Apply the ring to the measurement site. Ensure that the skin under the adhesive is not wrinkled.
Press gently on the retainer ring and move your finger around its circumference to ensure good adhesion of the ring to the skin.

STEP FIVE
Prepare the sensor
Open the Docking Station Door and remove the sensor.
Close the Docking Station Door.
Check the condition of the sensor membrane and the integrity of the sensor. If necessary, change the membrane. Do not use the sensor if any problems are noted.
Apply 1-2 small drops of contact liquid to the center of the sensor surface.
Keep the sensor horizontal (membrane facing upwards) so that the contact liquid does not run off the membrane. Flip over the sensor just before inserting it into the ring.
TIP! Always grab the sensor at its neck to avoid damaging the sensor cable.
TIP! Use Sentec Contact Gel for more accurate readings.
TIP! Alternatively, you can apply one small drop of contact liquid to the skin area in the center of the attachment ring.
TIP! Avoid wetting the adhesive tape.

STEP SIX
Attach the sensor
Holding the sensor at its neck, approach the attachment ring and first insert the nose of the sensor into the retainer ring.
Apply slight downward pressure on the sensor neck to position it in the ring. The spring tension of the retainer ring will pull the sensor into place with little to no pressure on the skin.
Rotate the sensor in the ring and press the sensor gently against the skin to spread the contact liquid.
Ensure that air gaps are eliminated between the skin and the sensor.
TIP! Check that the sensor can be easily rotated to ensure it is snapped in correctly.

STEP SEVEN
Verify sensor stabilization
Verify that the SDM detects that the sensor was placed on the patient and the PCO2 value begins to stabilize (PCO2 value in gray). Stabilization can take between 2-10 minutes. Once stabilized, the PCO2 value will turn green and the trend will begin to appear on the screen.
If the values do not stabilize or are not rising, check the sensor application for good contact between the skin and sensor.
If necessary, readjust sensor application or reposition the sensor.
TIP! You can change alarm limits for an individual patient by accessing the alarm menu.
How to remove the Sentec sensor
Once site time elapses, remove the sensor by gently pulling it out of the attachment ring.
Clean the sensor using 70% isopropanol. First, gently wipe the membrane surface. Then, clean the sides and outer rim and inspect the condition of the sensor membrane.
Allow the sensor to dry and return to the Docking Station.
Close the Docking Station Door. The monitor will automatically begin calibration.
TIP! The attachment ring can be left in place for up to 24 hours, allowing you to switch between application sites without removing and reattaching the adhesive.
TIP! When leaving the ring in place, remove any gel residue from the skin inside the ring between monitoring sessions.
TIP! Once the ring has been in place for 24 hours or otherwise needs to be replaced, remove the ring and inspect the skin.
TIP! It is recommended to keep the area free from adhesive for 8 to 12 hours after removal.
Choosing your attachment solution
During the application process, choose from a broad suite of attachment options to confidently select a solution that best supports each individual patient in the NICU.
MARe-SF
All-purpose ring for fragile skin that utilizes silicone-based adhesive
Good choice for prioritizing sensitive, well-perfused sites (like the forehead) in delicate infants
MARe-MI
All-purpose ring for mature, intact skin that utilizes acrylic-based adhesive
Good choice for prioritizing adhesion in a general NICU population
Staysite Adhesive
Additional layer of adhesion (acrylic based) to keep rings in place
Good choice for supporting longer term adhesion in sweaty or mobile infants or in high-humidity environments
Non-Adhesive Wrap
Soft, adhesive-free attachment that wraps around the thigh
Good choice for prioritizing skin integrity and avoiding humidity-adhesion issues in premature infants

