Transcutaneous Monitoring
Sensor Application and Patient Monitoring
Please refer to our Instruction Manual for more detailed information.
SUPPORT MENU
E-Learning Modules
Become an expert with our e-learning modules
Printable Guides
FAQs: During Monitoring
FAQs: Sensor and Monitor Maintenance
Follow these steps to clean the sensor:
- Remove sensor from patient and inspect the skin.
- Clean the sensor with a gauze soaked in 70% isopropanol or other approved cleaning agent.
- Gently wipe the sensor surface, then clean the sides of the membrane ring.
- Avoiding strain on the cable, gently clean the sensor cable from the sensor head to plug.
- Visually inspect the sensor and membrane.
- Place the sensor in the Docking Station and allow it to calibrate.
- Once you see the “Ready for Use” screen on the SDM, you can start a new monitoring session.
A full list of the approved cleaning and disinfection agents can be found here.
See the full instructions for resolving a gas leak in the docking station here.
Possible Cause
Sensor not properly positioned in Docking Station during last calibration.Recommended corrective action(s)
Verify that sensor is clean and is properly placed into the holder at the
inside of the Docking Station door and that the door properly closes.
Possible Cause
Gasket of Docking Station contaminated.Recommended corrective action(s)
Clean the Docking Station gasket with a cotton swab with 70% isopropanol. Remove any residual threads and fibers and allow to dry.
Possible Cause
Gasket of Docking Station defective or missingRecommended corrective action(s)
Carefully inspect the gasket and verify that it is present and well embedded in its notch.
Read full instructions for inserting a new gasket.
Possible Cause
Docking Station door and / or closing mechanism defectiveRecommended corrective action(s)
Carefully inspect the door and the closing mechanism for mechanical or functional damage. The closing mechanism must properly lock in place. If damaged contact qualified service personnel.
Possible Cause
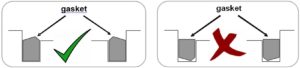
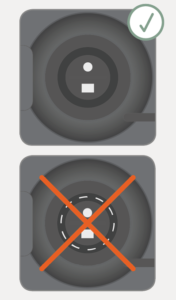
Incorrect orientation of gasket in docking station.Recommended corrective action(s)
Ensure correct orientation of gasket in docking station. The outward appearance of the gasket should be all black and slightly beveled. See image.For older all-black gaskets:
For newer white-marked gaskets:
For more troubleshooting information, see our
Service Manual.
Read full instructions for inserting a new gasket.
This message is commonly caused by a defective membrane or dried electrolyte. This video tutorial will guide you through the steps to resolve the error message.
Possible Cause
Membrane related (defective or dried up electrolyte)Recommended corrective action(s)
Change the membrane:
1) if it is damaged or missing, has a loose fit, or if there is trapped air or dry electrolyte under the membrane
2) sensor calibration takes almost 14 minutes or cannot be completed within 14 minutes
Possible Cause
PCO2 electrode and/ or white PO2 sensing spot contaminatedRecommended corrective action(s)
If after having changed the sensor membrane the calibration still takes almost 14 minutes or cannot be completed within 14 minutes contact qualified service personnel to clean the sensor without membrane.
Possible Cause
Sentec TC Sensor defectiveRecommended corrective action(s)
If the problem persists the Sentec TC Sensor is defect. Replace it with a new one.
For more troubleshooting information, see our Service Manual.
This message is commonly caused by a defective membrane or dried electrolyte. This video tutorial will guide you through the steps to resolve the error message.
Possible Cause
Membrane related (defective or dried up electrolyte)
Recommended corrective action(s)
Change the membrane:
1) if it is damaged or missing, has a loose fit, or if there is trapped air or dry electrolyte under the membrane
2) sensor calibration takes almost 14 minutes or cannot be completed within 14 minutes
Possible Cause
PCO2 electrode and/ or white PO2 sensing spot contaminated
Recommended corrective action(s)
If after having changed the sensor membrane the calibration still takes almost 14 minutes or cannot be completed within 14 minutes contact qualified service personnel to clean the sensor without membrane.
Possible Cause
Sentec TC Sensor defective
Recommended corrective action(s)
If the problem persists the Sentec TC Sensor is defect. Replace it with a new one.
For more troubleshooting information, see our Service Manual.
Watch this video to learn how to perform a clean and soak with your sensor.
Watch this video to learn how to perform a sensitivity test.
Note: Information provided in this section is intended for general guidance on frequently asked questions only and is subject to below disclaimer. Please refer to the Technical Manual and Service Manual for more information on Troubleshooting.
Still have questions?
Complete this form to for additional product support. After you’ve submitted your query, the appropriate Sentec associate will reach out with more information.

