Produktsupport
Wählen Sie ein Produkt aus, um relevante Supportressourcen anzuzeigen.
Transkutane Überwachung
Sensoranwendung und Patientenüberwachung
Klicken Sie auf ein Thema, um auf PDF- und Videomaterial zuzugreifen. Bitte verwenden Sie unsere Bedienungsanleitung für weitere Informationen.
Transkutane Überwachung
Sensoranwendung und Patientenüberwachung
Klicken Sie auf ein Thema, um auf PDF- und Videomaterial zuzugreifen. Bitte verwenden Sie unsere Bedienungsanleitung für weitere Informationen.


Benutzeroberfläche
Kontrollen vor der Überwachung
Sensor-Überprüfung und Applikation
Nach Überwachung des Patienten
Fehlerbehebung
Hinweis: Die in diesem Abschnitt bereitgestellten Informationen dienen nur zur allgemeinen Orientierung bei häufig gestellten Fragen und unterliegen dem untenstehenden Haftungsausschluss. Bitte verwenden Sie das Technical Manual und das Service Manual für weitere Informationen zur Fehlerbehebung.
There are a couple possible causes for this problem, each with an easy solution.
| Possible Cause(s) | Recommended corrective action(s) |
|---|---|
| Sensor loosely attached to patient | Verify that the sensor is securely attached and ensure that air gaps are eliminated between the skin and the sensor. If needed, reapply the sensor (on same or an alternate site). Consider to use the Staysite™ Adhesive (model SA-MAR) to complementary attach Multi-Site Attachment Rings if more secure sensor attachment is required, e.g. in high humidity environments, for patients who perspire profusely and/or in challenging patient motion conditions. |
| Sensor is applied to a measurement site that is not recommended for PCO2/PO2 monitoring | Apply sensor to a recommended measurement site with an appropriate Sensor Attachment Accessory. For instructions refer to the Quick Reference Guide for the SDMS or the Instruction Manual for the SDMS. |
| Excessive use of contact liquid | Remove sensor. Clean sensor and measurement site with an alcohol pad. Reapply the sensor using only one drop of contact liquid. |
Wenn diese Meldung während der Überwachung erscheint, hat sich der Sensor verschoben oder wurde absichtlich vom Patienten entfernt.
- Hinweis: Durch Drücken der „ENTER-Taste“ während dieser Meldung wird der Alarmzustand „Sensor abgefallen (↲)“ beendet, die Messdauer auf die ausgewählte „Messdauer“ zurückgesetzt und – falls durch SCHUTZ DER MESSSTELLE reduziert – die Sensorheizung reaktiviert. Der Messbildschirm bleibt aktiv.
- Hinweis: Das Einsetzen des Sensors in die „Docking Station“ beendet den Alarmzustand „Sensor abgefallen (↲)“ ebenfalls.
This video shows how to clean a sensor after patient monitoring.
Follow these steps to clean the sensor:
- Remove sensor from patient and inspect the skin.
- Clean the sensor with a gauze soaked in 70% isopropanol or other approved cleaning agent.
- Gently wipe the sensor surface, then clean the sides of the membrane ring.
- Avoiding strain on the cable, gently clean the sensor cable from the sensor head to plug.
- Visually inspect the sensor and membrane.
- Place the sensor in the Docking Station and allow it to calibrate.
- Once you see the „Ready for Use“ screen on the SDM, you can start a new monitoring session.
Eine vollständige Liste der zugelassenen Reinigungs- und Desinfektionsmittel finden Sie hier.
This error can occur when the docking station is contaminated, when there is a problem with the gasket, or when the sensor is not properly positioned during calibration. This video tutorial will guide you through the steps to resolve the error message.
| Possible Cause | Recommended Action |
|---|---|
| Sensor not properly positioned in Docking Station during last calibration. | Verify that sensor is clean and is properly placed into the holder at the inside of the Docking Station door and that the door properly closes. |
| Gasket of Docking Station contaminated. | Clean the Docking Station gasket with a cotton swab with 70% isopropanol. Remove any residual threads and fibers and allow to dry. |
| Gasket of Docking Station defective or missing | Carefully inspect the gasket and verify that it is present and well embedded in its notch. If damaged contact qualified service personnel. |
| Docking Station door and / or closing mechanism defective | Carefully inspect the door and the closing mechanism for mechanical or functional damage. The closing mechanism must properly lock in place. If damaged contact qualified service personnel. |
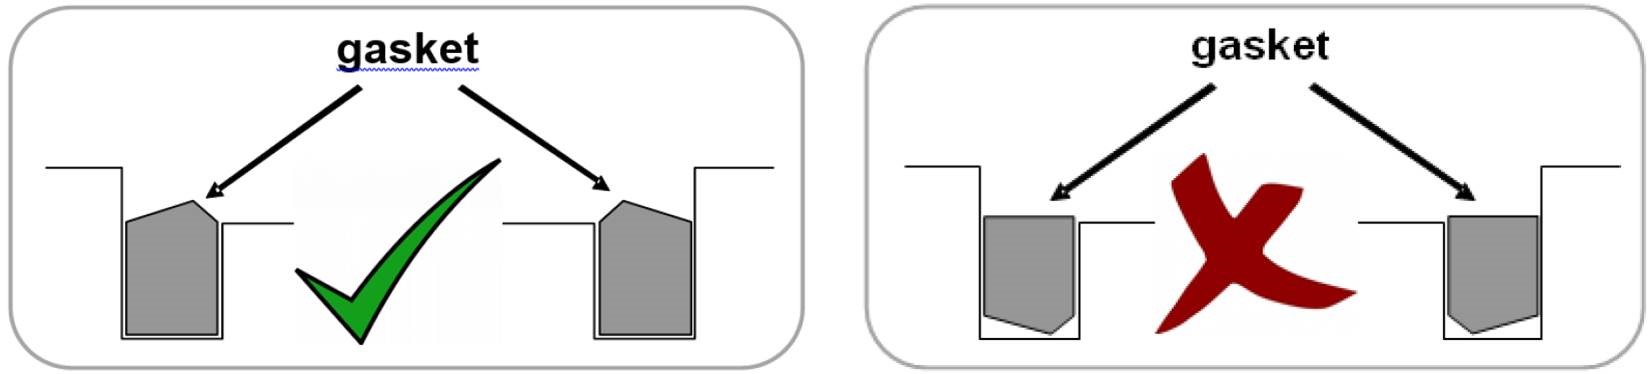
| Incorrect orientation of gasket in docking station. | Ensure correct orientation of gasket in docking station (beveled edge facing outward.) See image.
|
| For more troubleshooting information, see our Service Manual. |
Diese Meldung wird häufig durch eine defekte Membran oder ausgetrocknete Elektrolyte verursacht. Dieses Video-Tutorial führt Sie durch die Schritte zum Beheben der Fehlermeldung.
| Possible Cause | Recommended Action |
|---|---|
| Membrane related (defective or dried up electrolyte) | Change the membrane: 1) if it is damaged or missing, has a loose fit, or if there is trapped air or dry electrolyte under the membrane 2) sensor calibration takes almost 14 minutes or cannot be completed within 14 minutes |
| PCO2 electrode and/ or white PO2 sensing spot contaminated | If after having changed the sensor membrane the calibration still takes almost 14 minutes or cannot be completed within 14 minutes contact qualified service personnel to clean the sensor without membrane. |
| Sentec TC Sensor defective | If the problem persists the Sentec TC Sensor is defect. Replace it with a new one. |
| For more troubleshooting information, see our Service Manual. |
Diese Meldung wird häufig durch eine defekte Membran oder ausgetrocknete Elektrolyte verursacht. Dieses Video-Tutorial führt Sie durch die Schritte zum Beheben der Fehlermeldung.
| Mögliche Ursache | Empfohlene Maßnahme |
|---|---|
| Membranbedingt (defekte oder ausgetrocknete Elektrolyte) | Tauschen Sie die Membran aus: 1) wenn diese beschädigt oder nicht vorhanden ist, nicht fest genug angebracht wurde oder es Lufteinschlüsse oder trockenen Elektrolyten unter der Membran gibt 2) wenn der „Empfindlichkeitstest“ fehlschlägt. |
| PCO2-Elektrode und/oder weißer PO2-Messpunkt verschmutzt | Wenn der „Sensitivitätstest“ nach dem Austausch der Sensormembran immer noch fehlschlägt, wenden Sie sich an qualifiziertes Servicepersonal, um den Sensor ohne Membran zu reinigen. |
| Sentec TC-Sensor defekt | Bleibt das Problem bestehen, ist der Sentec TC-Sensor defekt. Ersetzen Sie ihn durch einen neuen. |
| Weitere Informationen zur Fehlerbehebung finden Sie in unserem Service Manual. |
Note: To ensure that correction of residual PCO2 drift is possible, wait to download SDM Trend Data until the status message changes from „Calibration in progress“ to „Ready for use“
Note: Ensure that in V-STATS the sub-menu ‘Measurement -> Correction of Residual PCO2 Drift’ is set to ‘Both’, to get the drift corrected PCO2 data is displayed as a blue curve in addition to the green curve of the uncorrected data. If set to ‘Off’ only the green curve representing uncorrected PCO2 data is displayed. If set to ‘On’ only the blue curve representing drift corrected PCO2 data is displayed.
Key Message: You must allow the sensor to complete a successful calibration following patient monitoring before turning off the monitor. If you turn off the monitor without calibrating the sensor, the drift corrected data will be lost and there will be no drift corrected values on your report.
Transkutane CO2-Überwachung bei Neugeborenen
Es gibt keinen Textauszug, da dies ein geschützter Beitrag ist.

CO2-Überwachung bei Patienten mit gestörtem Ventilations-Perfusions-Verhältnis
Blood draws for lab work are well-established as one of the main drivers of anemia of prematurity leading to a high rate of transfusion in the NICU. Learn more about the problem and how transcutaneous monitoring can be part of the solution.
Transkutane CO2-Überwachung bei Neugeborenen
Es gibt keinen Textauszug, da dies ein geschützter Beitrag ist.
CO2-Überwachung bei Patienten mit gestörtem Ventilations-Perfusions-Verhältnis
Blood draws for lab work are well-established as one of the main drivers of anemia of prematurity leading to a high rate of transfusion in the NICU. Learn more about the problem and how transcutaneous monitoring can be part of the solution.

