Wsparcie produktowe
Wybierz produkt, aby przejrzeć odpowiednie zasoby dotyczące wsparcia.
Monitorowanie przezskórne
Aplikacja czujnika i monitorowanie pacjenta
Kliknij temat, aby uzyskać dostęp do plików PDF i materiałów wideo. Więcej szczegółowych informacji można znaleźć w naszej instrukcji obsługi.
Monitorowanie przezskórne
Aplikacja czujnika i monitorowanie pacjenta
Kliknij temat, aby uzyskać dostęp do plików PDF i materiałów wideo. Więcej szczegółowych informacji można znaleźć w naszej instrukcji obsługi.


Interfejs użytkownika
Czynności kontrolne do wykonania przed przystąpieniem do monitorowania
Kontrola i aplikacja czujnika
Kontrola czujnika
Zapoznaj się z treścią dokumentu PDF lub obejrzyj poniższy film
Aplikacja czujnika — osoba dorosła
Zapoznaj się z treścią dokumentu PDF lub obejrzyj poniższy film
Aplikacja czujnika — noworodek
Zapoznaj się z treścią dokumentu PDF lub obejrzyj poniższy film
Aplikacja czujnika — klips uszny
Zapoznaj się z treścią dokumentu PDF lub obejrzyj poniższy film
Po zakończeniu monitorowania pacjenta
- Zdejmowanie czujnika — MAR
- Zdejmowanie czujnika — klips nauszny
- Kalibracja i przechowywanie czujnika
- Czyszczenie i kontrola czujnika | Zapoznaj się z treścią dokumentu PDF lub obejrzyj poniższy film
Konserwacja
- Wymiana butli z gazem
- Lista kontrolna czynności konserwacyjnych SDMS
- Wymiana membrany czujnika | Zapoznaj się z treścią dokumentu PDF lub obejrzyj poniższy film
Ekrany i funkcje monitorowania
Rozwiązywanie problemów
Note: Information provided in this section is intended for general guidance on frequently asked questions only and is subject to below disclaimer. Please refer to the Technical Manual and Service Manual for more information on Troubleshooting.
There are a couple possible causes for this problem, each with an easy solution.
| Possible Cause(s) | Recommended corrective action(s) |
|---|---|
| Sensor loosely attached to patient | Verify that the sensor is securely attached and ensure that air gaps are eliminated between the skin and the sensor. If needed, reapply the sensor (on same or an alternate site). Consider to use the Staysite™ Adhesive (model SA-MAR) to complementary attach Multi-Site Attachment Rings if more secure sensor attachment is required, e.g. in high humidity environments, for patients who perspire profusely and/or in challenging patient motion conditions. |
| Sensor is applied to a measurement site that is not recommended for PCO2/PO2 monitoring | Apply sensor to a recommended measurement site with an appropriate Sensor Attachment Accessory. For instructions refer to the Quick Reference Guide for the SDMS or the Instruction Manual for the SDMS. |
| Excessive use of contact liquid | Remove sensor. Clean sensor and measurement site with an alcohol pad. Reapply the sensor using only one drop of contact liquid. |
Pojawienie się tego komunikatu podczas monitorowania oznacza, że czujnik przemieścił się lub został celowo usunięty z ciała pacjenta.
- Uwaga: Naciśnięcie przycisku „ENTER” podczas wyświetlania tego komunikatu spowoduje zakończenie stanu alarmowego „Sensor poza pacjentem (↲)”, zresetowanie licznika czasu pomiaru do wybranego „Czasu pomiaru” i — w przypadku zmniejszenia przez funkcję OCHRONA MIEJSCA — ponowne aktywowanie ogrzewania czujnika. Ekran pomiaru pozostanie aktywny.
- Uwaga: Włożenie czujnika do „stacji dokującej” spowoduje również zakończenie stanu alarmowego „Sensor poza pacjentem (↲)”.
This video shows how to clean a sensor after patient monitoring.
Follow these steps to clean the sensor:
- Remove sensor from patient and inspect the skin.
- Clean the sensor with a gauze soaked in 70% isopropanol or other approved cleaning agent.
- Gently wipe the sensor surface, then clean the sides of the membrane ring.
- Avoiding strain on the cable, gently clean the sensor cable from the sensor head to plug.
- Visually inspect the sensor and membrane.
- Place the sensor in the Docking Station and allow it to calibrate.
- Once you see the „Ready for Use” screen on the SDM, you can start a new monitoring session.
Pełną listę zatwierdzonych środków czyszczących i dezynfekujących można znaleźć tutaj.
This error can occur when the docking station is contaminated, when there is a problem with the gasket, or when the sensor is not properly positioned during calibration. This video tutorial will guide you through the steps to resolve the error message.
| Possible Cause | Recommended Action |
|---|---|
| Sensor not properly positioned in Docking Station during last calibration. | Verify that sensor is clean and is properly placed into the holder at the inside of the Docking Station door and that the door properly closes. |
| Gasket of Docking Station contaminated. | Clean the Docking Station gasket with a cotton swab with 70% isopropanol. Remove any residual threads and fibers and allow to dry. |
| Gasket of Docking Station defective or missing | Carefully inspect the gasket and verify that it is present and well embedded in its notch. If damaged contact qualified service personnel. |
| Docking Station door and / or closing mechanism defective | Carefully inspect the door and the closing mechanism for mechanical or functional damage. The closing mechanism must properly lock in place. If damaged contact qualified service personnel. |
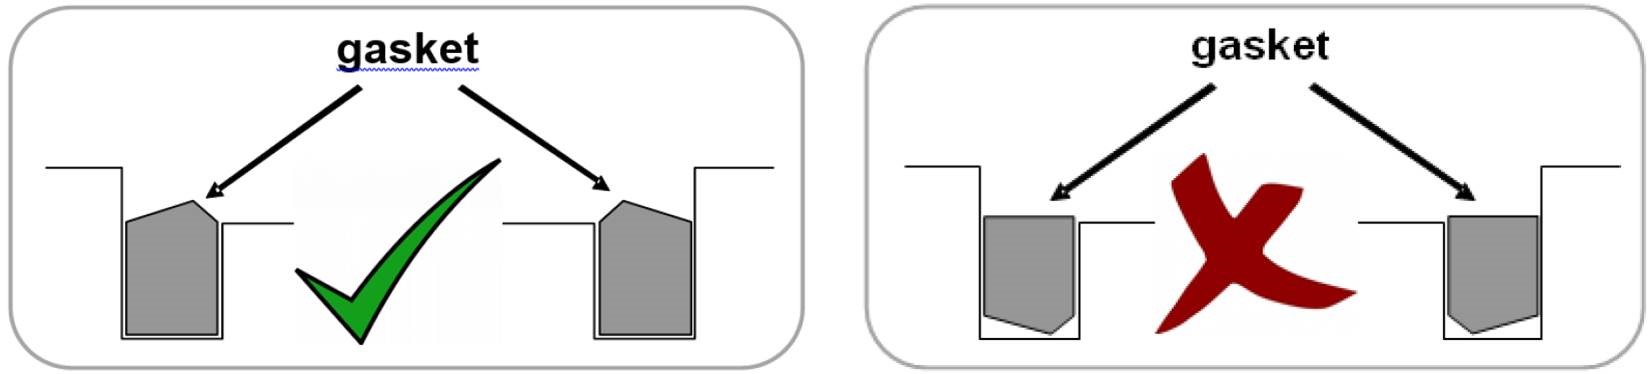
| Incorrect orientation of gasket in docking station. | Ensure correct orientation of gasket in docking station (beveled edge facing outward.) See image.
|
| For more troubleshooting information, see our Service Manual. |
Ten komunikat jest zwykle spowodowany wadliwą membraną lub wyschniętym elektrolitem. W tym filmie instruktażowym można znaleźć szczegółowe instrukcje dotyczące postępowania w przypadku wyświetlenia komunikatu o błędzie.
| Possible Cause | Recommended Action |
|---|---|
| Membrane related (defective or dried up electrolyte) | Change the membrane: 1) if it is damaged or missing, has a loose fit, or if there is trapped air or dry electrolyte under the membrane 2) sensor calibration takes almost 14 minutes or cannot be completed within 14 minutes |
| PCO2 electrode and/ or white PO2 sensing spot contaminated | If after having changed the sensor membrane the calibration still takes almost 14 minutes or cannot be completed within 14 minutes contact qualified service personnel to clean the sensor without membrane. |
| Sentec TC Sensor defective | If the problem persists the Sentec TC Sensor is defect. Replace it with a new one. |
| For more troubleshooting information, see our Service Manual. |
This message is commonly caused by a defective membrane or dried electrolyte. This video tutorial will guide you through the steps to resolve the error message.
| Possible Cause | Recommended Action |
|---|---|
| Membrane related (defective or dried up electrolyte) | Change the membrane: 1) if it is damaged or missing, has a loose fit, or if there is trapped air or dry electrolyte under the membrane 2) sensor calibration takes almost 14 minutes or cannot be completed within 14 minutes |
| PCO2 electrode and/ or white PO2 sensing spot contaminated | If after having changed the sensor membrane the calibration still takes almost 14 minutes or cannot be completed within 14 minutes contact qualified service personnel to clean the sensor without membrane. |
| Sentec TC Sensor defective | If the problem persists the Sentec TC Sensor is defect. Replace it with a new one. |
| For more troubleshooting information, see our Service Manual. |
Note: To ensure that correction of residual PCO2 drift is possible, wait to download SDM Trend Data until the status message changes from „Calibration in progress” to „Ready for use”
Note: Ensure that in V-STATS the sub-menu ‘Measurement -> Correction of Residual PCO2 Drift’ is set to ‘Both’, to get the drift corrected PCO2 data is displayed as a blue curve in addition to the green curve of the uncorrected data. If set to ‘Off’ only the green curve representing uncorrected PCO2 data is displayed. If set to ‘On’ only the blue curve representing drift corrected PCO2 data is displayed.
Key Message: You must allow the sensor to complete a successful calibration following patient monitoring before turning off the monitor. If you turn off the monitor without calibrating the sensor, the drift corrected data will be lost and there will be no drift corrected values on your report.
Watch this video to learn how to perform a clean and soak with your sensor.
Watch this video to learn how to perform a sensitivity test.

